Introduction
One of the most important tools in anyone’s shop are those that are used to make reliable and precise measurements. From the basic 12” ruler to atomic clocks, there are a vast array of instruments that can measure anything that requires a quantifiable numeric value. Today I’d like to talk briefly about dial and dial test indicators. When used correctly, these invaluable devices can provide the amateur or professional with pinpoint measurements. So, what is a dial indicator and what is it used for?
How They Work…
The business end of a dial indicator has a plunger with a ground point that contacts the surface to be measured. As the plunger pushes in towards the body of the indicator, the linear movement is translated to rotational movement via clockwork gearing (on the analog models) and ultimately to the readout of the device. The face will contain a large and, at times, a small dial indicator. The large dial represents the total measurable increments of movement in 1 revolution of travel. The small indicator represents the total amount of revolutions that the large indicator has made. For example: A 0-1” indicator with 0.001” graduation points will have 0-9 in the small indicator and 0-99 on the large. If you get a reading of 4 on the small indicator and 65 on the large, the total travel is 0.465”.
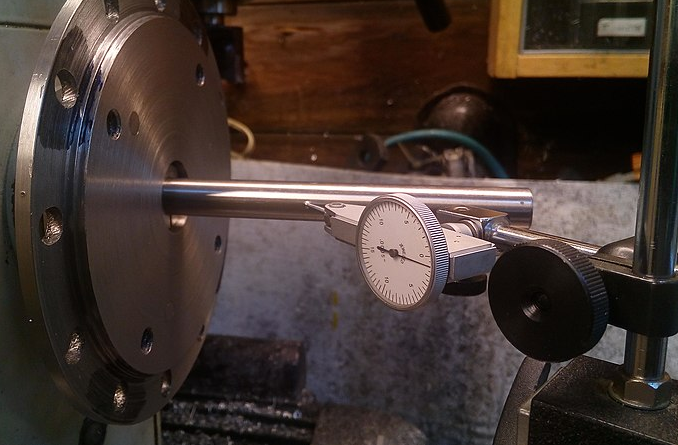
Dial Test indicators basically work on the same premise but are utilized for smaller measurements down to 0.0001” or smaller. Instead of a plunger they sport a contact stylus with a tungsten carbide or ruby tip. Like dial indicators the movement of this tip is translated to rotary movement of the dial pointer. Being that these are for a finer resolution of measurement, the total length of travel is much lower. The range limits are typically 0 to 0.015” or 0.030”.
Tips For Use…
Here are a few things to remember when using an indicator.
- Use with care. These are fragile precision instruments. Never use an indicator in a manor that will push it further than its range as it can cause damage to both internal and external components.
- Keep them clean. These can be an investment so take care to keep them clean and stored in a dry place.
- Perpendicular or Parallel. If using a dial indicator keep the stem as perpendicular to the measured surface as possible. On the flip side, the stylus of a test indicator should be as parallel as possible. This will reduce cosine error in your measurement (way too much to go into in this post…. but trust me…. or Google it). The indicator is never wrong, but your measuring technique can be incorrect if you don’t take care.
Applications…
A dial/test indicator is typically used when comparing one surface to another. To elaborate, if you wanted to measure the flatness of a surface you can quickly see, not only how flat it is, but where the high and low spots reside. The key is to have your part and indicator stand on a known flat surface such as a surface plate.
Examples
In the example if you were to measure one corner and “zero” the indicator, you could then evaluate the remaining surface by sliding the indicator to various locations noting the variation across that area. It tells the user not only how flat the surface is but how parallel it is to the surface plate its sitting on. While this doesn’t tell you how tall the part is it does tell you the variability. However, with gage blocks stacked to the target height you can zero the indicator, measure the part, and know how far from target you are.
We also use indicators to measure concentricity and alignment. Take a look at the second example, let’s say 2 shafts that require alignment. With the indicator you can sweep the various surfaces to evaluate radial, axial, and angular deviations. By obtaining these measurements you can make the needed adjustments to bring the 2 shafts into alignment. This type of precision and attention to detail improves equipment performance and longevity.


One question I often get is “Where do I spend money and where can I get away with cheap knock offs?”. Well, when it comes to any measuring tools, I believe that you get what you pay for. I have found that if you spend the extra money to purchase a good dial indicator, with good care, you will have it for the rest of your life. New or used, the purchase of high-quality measurement instruments will pay dividends in the long run.
Conclusion
Dial indicators are one of the most versatile measuring tools in the shop. While many projects don’t call for the level of precision that an indicator can offer, if you take the time to learn how to utilize these devices you can apply those techniques to other tasks. Learning to take careful, reliable measurements on an indicator can lead to quality measurements with a simple tape measure. Good Practices = Good Workmanship


